Wed, 5 Aug 2026

Diagnosing Weird Thingino Errors

— SjG @ 1:58 pm

Well, just a few months into using a Thingino-flashed WyzeCam3, I noticed that one of the units had stopped responding.

I could see it connecting to the network (or at least taking a DHCP lease from the router), but all connection attempts failed. The LED was lit, but I couldn’t tell what it was doing. I shut it down, and checked the SD Card — the last motion it had captured was from fifteen hours ago, although there was plenty of room left on the card. Something was weird.

I powered it back up, confirmed that it was connecting to the network, and checked to see if it was actually offering any network services. This was where things got weirder:

#nmap -Pn 192.168.x.x
Starting Nmap 7.99 ( https://nmap.org ) at 2026-08-05 08:49
Nmap scan report for MuhCam.lan (192.168.x.x)
Host is up (0.051s latency).
Not shown: 999 filtered tcp ports (no-response)
PORT   STATE SERVICE
53/udp open  ssh

Nmap done: 1 IP address (1 host up) scanned in 11.03 seconds

Say what!? Running sshd with UDP listening on the DNS port!? I’ve seen strange configurations in my time, but I haven’t seen that. Also, trying to ssh to that port didn’t work.

The fact that it connected to WiFi told me that it was mostly booting, but this made me think there was some corruption in the config files. It made no sense.

I was getting ready to open it up and see if there was a way I could hook up to a serial console or some other desperate measure, when I saw it flash the IR LEDs briefly, but not very brightly. This roused suspicion. Out of curiosity, I swapped the USB cable that it uses for power. Slightly different results now:

-Pn 192.168.x.x
Starting Nmap 7.99 ( https://nmap.org ) at 2026-08-05 09:14
Nmap scan report for MuhCam.lan (192.168.x.x)
Host is up (0.029s latency).
Not shown: 999 filtered tcp ports (no-response)
PORT STATE SERVICE
123/udp open ssh

Nmap done: 1 IP address (1 host up) scanned in 10.19 seconds

OK, so now it says that sshd is listening on the NTP port? So whatever was corrupting the config files was not a one-time thing. Was it filesystem issues? Memory corruption? Failing hardware?

I thought Id’ try one more thing. I unplugged it, and plugged the original USB cable into a different A/C adapter.

What do you know? It came up cleanly, with the configuration intact! It was the power supply!

For the record, the normal nmap output looks more like:

#nmap -Pn 192.168.x.x            
Starting Nmap 7.99 ( https://nmap.org ) at 2026-08-05 09:27
Nmap scan report for MuhCam.lan (192.168.x.x)
Host is up (0.0053s latency).
Not shown: 994 closed tcp ports (conn-refused)
PORT     STATE SERVICE
22/tcp   open  ssh
53/tcp   open  domain
80/tcp   open  http
443/tcp  open  https
554/tcp  open  rtsp
8080/tcp open  http-proxy

Nmap done: 1 IP address (1 host up) scanned in 1.72 seconds


Fri, 26 Jun 2026

Setting up a WyzeCam3 as a Stand-alone Unit with Thingino

— SjG @ 10:45 am

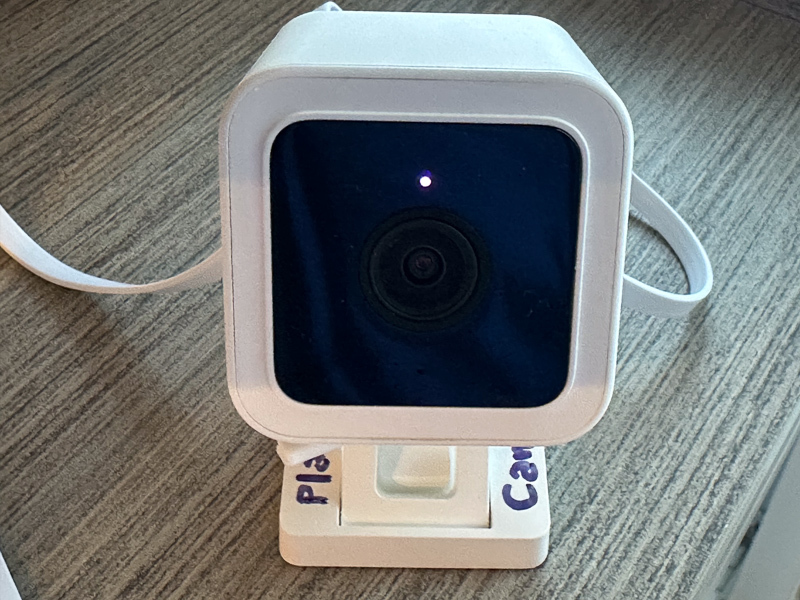
The WyzeCam3 is a relatively cheap device that can capture video. It can be set up for motion capture or continuous recording. But even if you install a memory card in the device, it will want to use the company’s app and stream data via their cloud storage. I don’t know much about how much thought went into their codebase with regard to security, but this is the kind of device where the usual answer is “not much.”

Furthermore, the WyzeCam requires an app for installation and configuration, and the WyzeCam3 needs to connect to your 2.4GHz WiFi network. Oops. I have no 2.4GHz WiFi network. It’s all 5Ghz here. Now what?

Enter Thingino, an open-source replacement firmware. One nice feature is that it allows the camera hardware to enable an Wi-Fi access point (“AP mode”) — it creates its own 2.4GHz WiFi network, which my Mac will happily connect to! Once the camera is set up, I can further customize things, and have it write motion capture files to the SD memory card rather than someone’s cloud.

You’re being watched…

So, there’re a few gotchas that were not obvious to me:

  1. When you’ve downloaded the firmware, you need to use something to flash it as an image on your micro-SD (e.g., Balena Etcher, Rufus, or the like). I came across at least one guide that said “simply copy the files onto the SD card” which is incorrect!
  2. When the Thingino installation has completed, you connect to the WiFi network it creates. A captive portal form pops up for basic configuration. You’re asked to provide a device name, a root password, and a WiFi SSID and password. There’s also a checkbox to have the camera create its own WiFi hot-spot (the aforementioned AP mode). If you’re going to have it work in AP mode, the SSID and password you provided above are used for the network it creates. If you are not, it will use those to connect to an existing network. Don’t make the mistake of giving the SSID and credentials for your existing network and then checking that checkbox!
  3. Once you’ve installed Thingino via the SD card and you’ve connected to the network admin, you might want to set up motion capture to “Storage.” You’re gonna have to reformat that SD card first! The UI won’t complain, or tell you why it’s not working, but it just won’t let you submit the form. Thingino recommends formatting in exFAT.
  4. Even if you’ve configured the “Motion” panel, you have to click on the Storage link and tell it that you really mean the storage mounted at /mnt/mmcblk0p1 (or the mountpoint for your SD card ). You can have motion sensing and capture enabled, but it will fail if you haven’t taken that step.
  5. You may need to go into storage manager to tell it how to clear off space before you can enable motion capture. The control panel for motion capture does not seem consistent.
  6. Even after all that, the motion capture details may not save correctly. At least the firmware version I downloaded, it just wouldn’t save the settings consistently. There is a workaround! You have to ssh in to the camera, and set the values:
    Enable motion detection
    jct /etc/prudynt.json set motion.enabled true
    jct /etc/prudynt.json set motion.send2storage true
    Configure the storage destination
    jct /etc/send2.json set storage.mount /mnt/mmcblk0p1
    jct /etc/send2.json set storage.send_video true
    Set motion sensitivity, range is 1-8, default is 1. Higher = more sensitive
    jct /etc/prudynt.json set motion.sensitivity 5
    Configure clip length (in seconds)
    jct /etc/prudynt.json set motion.video_length 15
    Restart prudynt
    /etc/init.d/S31prudynt restart
  7. If you want to restore the original WyzeCam firmware, the instructions say to copy the original config files that get backed up by the Thingino install into the root directory of the SD card, name the file autoupgrade-full.bin, and then power it up. Oh, did you have that SD card formatted in exFAT? Ha ha, the firmware replacement process requires the SD card to be formatted FAT32 with Master Boot Record (MBR). The failure mode for this is somewhat opaque — it does seem to do something, and then in my case it announced it was ready for setup… in Italian. It was not ready for setup, though, as it hadn’t replaced the firmware.

Other Problems:

  1. There’s no way to have the device do its own time management without a network (NTP). You can set the clock (ssh in, use the “date” command in BusyBox) but it doesn’t survive power-cycles.
  2. I set up an isolated 2.4GHz guest network for the cameras that only allows DNS and NTP traffic to/from the internet. Then I went to reconfigure the cameras to use that network. From the admin panel, when I changed the network settings and turned off the “create AP,” it never seemed to connect. I had to reflash to the original firmware and then reinstall Thingino.

Other notes:

  1. If you set up the Thingino camera with an AP network, it defaults to the IP address 100.64.1.1

Sun, 7 Dec 2025

Holiday memories

— SjG @ 2:31 pm

We used to have a lot of physical devices on our network*. Servers, firewalls, file-shares, staging servers, development machines… all sitting on the network with their hard drives endlessly spinning, spinning, spinning!

System administrators are fond of referring to platter-based hard drives as “spinning rust,” partly as a reference to the ferro-magnetic iron crystals that store the actual data, but also to remind us that it’s always decaying and corroding. Over time, drives start generating errors or becoming unreliable. When we had physical devices that exhibited issues, we’d yank the hard drive and replace it. Over the years, we’d accumulated a pile of a dozen or more drives that were unreliable or bad but still contained data.

The data is not especially sensitive, but there could be stuff that could be abused or belongs to other parties. There may well be meeting notes, source code, sample data files, or there could be cached passwords or other credentials. It’s not worth just hoping it’d be OK to release to the world. So it’s a chore to render this data unreadable.

Pulling apart spinning platter hard disks is humbling. These are incredible little devices, with incredibly precise machining and elegant engineering. Going through a pile that spans a decade, you can actually see the improvements in technology: new vibration damping systems, different head-parking strategies, traps for dust, and more. I see these parts, and am inspired by the craftsmanship that goes into them.

So in the spirit of admiration, I offer these (hopefully unreadable) holiday memories.

* Now, of course, we have few physical devices but all those same services are implemented on “the cloud.” This means that someone else has physical devices somewhere, with their hard drives (or SSDs) endlessly spinning, spinning, spinning (or trimming, trimming, trimming).

Mon, 16 Dec 2019

Maccabeam™ Part 6: Final Project Gallery

— SjG @ 9:38 pm

Previously:
Introduction
Part 1: Simulating candle-light with pseudo-random sequences
Part 2: Some physical structure
Part 3: When Exactly is Hanukkah?
Part 4: A Typical Programming Problem
Part 5: Oil and Lasers

So here we are, six days away from Hanukkah, and the first build of the Maccabeam™ is complete!

Below is video of it running, and a general build gallery. But before that, here are some thoughts and lessons that will go into Version 2 (and/or a kit, if that ever happens).

I build things the old-fashioned way. Everything’s soldered onto a breadboard with finicky little wires (I used wire-wrap wire, since it’s fine and easy to twist around). While this is fine for prototyping, it’s not great for a finished product. I need to learn to use a design app, and have printed circuit boards made.

A printed circuit board would make the positioning of the LEDs better, too. I bought the LEDs on a long strip, which I then cut and wired together. If I used surface-mount LEDs, I wouldn’t have to worry about the width of the strip and making each little segment fit in the channel. It sounds simple, but in the corner areas, it got congested.

The next design won’t just use a printed circuit board. It will also use standard connectors so the disparate parts may be added and removed easily while building.

Back to the LEDs. The decision to put the LEDs behind a layer of frosted acrylic to make the light more diffuse may not have been the right one either. When the “marching ants” animation is running to indicate the shamos lighting the other candles, the diffuse light bleeds over into the neighboring star-shaped windows, disrupting the flow of the animation a little.

The physical hanukkiah, all the laser-cut wood, works well, but it makes access to the internal components very difficult. The screws hold it together, but there’s enough play in the screw-holes that I supplemented with hot glue. When I had to replace one of the laser diodes that burned out, I had to tear the whole thing down. The next design should be more maintainable.

Speaking of lasers, the inexpensive laser diodes I purchased online are not really very good. The brightness varies dramatically! Now, they’re representing candles, so the variation is not a show-stopper, but the dimmer lasers are not bright enough for a well-lit room. You can see this in the video below.

I didn’t write about how I programmed the “music.” To make a long story short, I found sheet music of “Hanukkah Oh Hanukkah” online. Using the Wikipedia article on reading music, I translated the sheet music into the notes. The LCD display has a small piezo-electric speaker on it, and you can play notes by sending special codes on the serial lines to the display. So I took the notes, and translated them into those codes. It’s what the kids call chip-tunes, but perhaps next time I’ll go for the Teensy audio board, and play a stereophonic MP3 off of a memory card.

Another thing I didn’t write about was simulation mode. When the silver switch on the left is thrown to the left, the circuit gets time and date from the GPS unit. But I couldn’t wait for Hanukkah to test my code! Given the number of bugs found and fixed during development, it would have taken me several centuries worth of Hanukkahs to get it right. Therefore, I implemented a simulation mode. When the switch is to the right, we magically locate ourselves in Jerusalem, and set the time just before sundown on the 24th of Kislev. This allowed me to endlessly watch Hannukah arrive, and get the animated displays to my satisfaction.

Anyway, the results are below! We’ll see if it’s satisfactory in just a few days…

View of the LCD Display (Simulation mode)
Start of Day 6 (Simulation mode)

Mon, 9 Dec 2019

Maccabeam™ Part 4: A Typical Code Problem

— SjG @ 8:43 pm

Previously:
Introduction
Part 1: Simulating candle-light with pseudo-random sequences
Part 2: Some physical structure
Part 3: When Exactly is Hanukkah?

The build is coming together.

One discovery was a sneaky bug in the date conversion code. originally, the code had used standard C library for doing some time manipulations. These functions like mktime are used to convert from a structure containing year, month, day, hour, minute, and second to a single large number of seconds. Similarly, there’s gmtime which does the reverse. One nice thing about these functions is that you can use them for arithmetic, e.g., pass mktime all the regular values but a negative value for the hour, then convert back with gmtime to get the computed time. If you want to do the arithmetic yourself, you have to handle all of the boundaries (e.g., if you’ve rolled back into the past hour … or day … etc.)

Under the hood, mktime is doing something like what was described in the last posting about date conversions: it computes a number of seconds from the epoch given the year, month, day, hour etc. The epoch is an arbitrarily defined date and time standard. In most C / Unix environments, it’s the midnight of 1 January 1970 (e.g., the 0th second of 1970). The gmtime function does the reverse, converting a number of seconds from that epoch into a date and time.

I use this feature when computing sunrise and sunset times. Paul Schylter’s suntime.c returns a number of hours and/or minutes to each event. If the sun has already risen on the day you’re computing, for example, you’ll get a negative hour and or minute for sunrise. If the sunrise has not yet happened, the values are positive. I assembling times by adding those offsets to the current hour and minute, and passing the values to mktime. I didn’t have to worry whether the value was still the same hour or day, because mktime sorts it all out for me.

Somewhere along the line, however, I switched from the standard C library for time to using Paul Stoffregen’s Time Library. I did this because it integrates nicely with the GPS. What I neglected was that in C’s standard library, the components of the time structure are integers but in Paul’s library they are unsigned 8-bit integers.

For simple 8-bit integers, the highest-order bit is used for the sign of the number. In other words, a binary value of 00000011 would represent 3, and 10000011 would represent -3. That way, an 8-bit integer can represent values from -127 to 127. An unsigned 8-bit integer, however, uses the highest-order bit like any other bit, so 00000011 would still represent 3, but 10000011 would represent 131!

All this to say, my trick of passing possibly-negative hours or minutes into the equivalent of mktime was not doing what I had thought! When I thought I was computing the time of sunrise that was 7 hours earlier by passing hour - 7, I was actually computing the time as hour + 135. It turns out that tweaking Paul’s library to supports signed integers was simple.

The moral of this particular story is pay attention when changing C libraries.