The ffmpeg family of programs is incredibly arcane and powerful for handling video and video information. I needed to get the run times of a collection of videos. Here’s a handy one-liner that creates output suitable for import into a spreadsheet:
for i in *.mp4; do q=ffprobe -i "$i" -show_entries format=duration -v quiet -of csv="p=0";echo "$i, $q"; done
Sample run: $ cd ~/work/training_videos $ for i in *.mp4; do q=ffprobe -i "$i" -show_entries format=duration -v quiet -of csv="p=0";echo "$i, $q"; done First_steps.mp4, 70.868000 Create_a_project.mp4, 134.320000 Loading_libraries.mp4, 45.442000 ...
Somewhere along the line, I did some software update on my MacBook machine that broke the Karma tests for an AngularJS 1.x application. I don’t know when this happened. I haven’t done work on this project on any computer except on my work desktop in a long, long time.
However, with Covid-19 and the work-from-home regimen, I need to make this work on the MacBook.
When I’d run the tests, I’d get a lovely crash:
27 03 2020 14:35:38.395:ERROR [reporter]: Can not load reporter "junit", it is not registered!
   Perhaps you are missing some plugin?
 27 03 2020 14:35:38.473:INFO [karma]: Karma v2.0.5 server started at http://0.0.0.0:9876/
 27 03 2020 14:35:38.474:INFO [launcher]: Launching browser PhantomJS with unlimited concurrency
 27 03 2020 14:35:38.475:ERROR [karma]: { inspect: [Function: inspect] }
Naturally, the first thing I’d do is make sure I’d installed the correct plugin: npm install karma-junit-reporter --save … Node happily reinstalled the plugin, and nothing changed. The source of the issue turned out to be a conflict between the project-installed karma-cli and bits and bobs of an old global install.
I had to clean up the globally-installed stuff that was lurking in /usr/local/bin and /usr/local/lib/node_modules (which is to say, deleted /usr/local/lib/node_modules/karma, /usr/local/lib/node_modules/karma-jasmine, and /usr/local/lib/node_modules/jasmine) leaving everything in the local project install with the exception of karma-cli, which is still globally installed.
To get people out to the polls, the numbers are pretty clear. Canvassing is the most effective technique to get people engaged. After that it’s not exactly clear whether texting, phone banking, or sending post-cards is next best.
But hey, Covid-19 means no canvassing right now. I hate telephones, so postcarding seems like a next-best approach. A lot of campaigns have their own systems set up, or you can contact Postcards to Voters and join up with their efforts.
You can get a lot of nice designs through a cooperation between Postcards to Voters and My Postcards. I wanted to come up with a few designs of my own. The individual files can be sent to a printing service and printed on 4″x6″ postcards, or you can download the combined version where they were squished to fit on a single sheet if you want to try printing them yourself.
Click on any of the images below to download a 300dpi PDF version.
So here we are, six days away from Hanukkah, and the first build of the Maccabeam™ is complete!
Below is video of it running, and a general build gallery. But before that, here are some thoughts and lessons that will go into Version 2 (and/or a kit, if that ever happens).
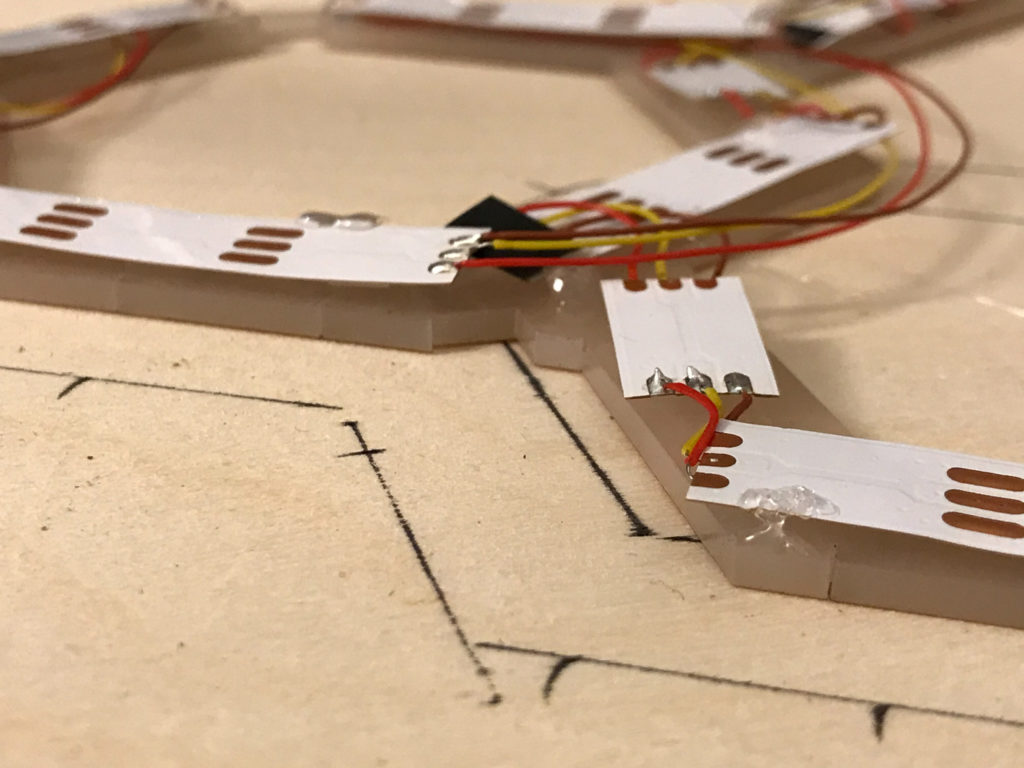
I build things the old-fashioned way. Everything’s soldered onto a breadboard with finicky little wires (I used wire-wrap wire, since it’s fine and easy to twist around). While this is fine for prototyping, it’s not great for a finished product. I need to learn to use a design app, and have printed circuit boards made.
A printed circuit board would make the positioning of the LEDs better, too. I bought the LEDs on a long strip, which I then cut and wired together. If I used surface-mount LEDs, I wouldn’t have to worry about the width of the strip and making each little segment fit in the channel. It sounds simple, but in the corner areas, it got congested.
The next design won’t just use a printed circuit board. It will also use standard connectors so the disparate parts may be added and removed easily while building.
Back to the LEDs. The decision to put the LEDs behind a layer of frosted acrylic to make the light more diffuse may not have been the right one either. When the “marching ants” animation is running to indicate the shamos lighting the other candles, the diffuse light bleeds over into the neighboring star-shaped windows, disrupting the flow of the animation a little.
The physical hanukkiah, all the laser-cut wood, works well, but it makes access to the internal components very difficult. The screws hold it together, but there’s enough play in the screw-holes that I supplemented with hot glue. When I had to replace one of the laser diodes that burned out, I had to tear the whole thing down. The next design should be more maintainable.
Speaking of lasers, the inexpensive laser diodes I purchased online are not really very good. The brightness varies dramatically! Now, they’re representing candles, so the variation is not a show-stopper, but the dimmer lasers are not bright enough for a well-lit room. You can see this in the video below.
I didn’t write about how I programmed the “music.” To make a long story short, I found sheet music of “Hanukkah Oh Hanukkah” online. Using the Wikipedia article on reading music, I translated the sheet music into the notes. The LCD display has a small piezo-electric speaker on it, and you can play notes by sending special codes on the serial lines to the display. So I took the notes, and translated them into those codes. It’s what the kids call chip-tunes, but perhaps next time I’ll go for the Teensy audio board, and play a stereophonic MP3 off of a memory card.
Another thing I didn’t write about was simulation mode. When the silver switch on the left is thrown to the left, the circuit gets time and date from the GPS unit. But I couldn’t wait for Hanukkah to test my code! Given the number of bugs found and fixed during development, it would have taken me several centuries worth of Hanukkahs to get it right. Therefore, I implemented a simulation mode. When the switch is to the right, we magically locate ourselves in Jerusalem, and set the time just before sundown on the 24th of Kislev. This allowed me to endlessly watch Hannukah arrive, and get the animated displays to my satisfaction.
Anyway, the results are below! We’ll see if it’s satisfactory in just a few days…
View of the LCD Display (Simulation mode)Start of Day 6 (Simulation mode)
So, remember how the one of the original requirements was that the lasers would illuminate vials of olive oil? Now that I’m at the point where I have the lasers working, I’ve discovered that olive oil is more transparent than I anticipated. In my mind, I kind of saw the oil illuminating evenly from the laser light when, in fact, it just creates a single faint beam like this:
Laser illuminating a full vial of oil
So, I could see that I got nice reflection and illumination off of the air-oil boundary up top, so the next thing I tried was filling the vial only partially:
Laser illuminating a partially full vial of oil
That’s better, but still lacks something. The next idea was to mix some very fine glitter into the oil:
Laser illuminating a partially full vial of oil with glitter
I like this! I think it looks really nice, but there’s still a problem. The glitter lamps and lava lamps that inspired this approach use convective forces to keep the glitter or wax moving inside the lamp. In my system, the laser light doesn’t transfer any measurable thermal energy to the oil, which means that there is no convection or other currents in the oil. So it looks good for a while, but as the next video shows, after ten minutes, we’re pretty much back to just a vial of oil — but with a clump of glitter on the bottom occluding the light.
Ten minutes later: Laser illuminating a partially full vial of oil with glitter
So how do you make it so glitter doesn’t sink to the bottom of the oil? Introduce thickeners! In this case, I blended in some corn starch, carefully heating it for maximum absorbtion. Now, not only is this getting way away from the original idea of illuminated oil (corn starch in the menorah probably violates halacha somehow), but I was unable to do it in a way that didn’t just cloud up and look icky.
Laser illuminating a partially full vial of oil, corn starch, and glitter
Not only does that look like a distressing medical sample, it still suffers from the same problem. The thickener slows the sinking of the glitter, but doesn’t prevent it entirely. After half an hour, it’s just murky soup:
Half an hour later: laser illuminating icky blend of corn starch and oil.
Going back to the observation from the beginning, I’d got nice scattering from the interface of the oil and the air. Maybe I’d get the same nice scattering from an interface between crystal and the oil. So I filled the vial with a few faceted bits of crystal to see:
Laser illuminating a vial containing oil and crystal beads
It’s a lot nicer than the oil/corn starch blend, but still not spectacular. Still, it fels like moving in the right direction. The last experiment was to fill up the vial with small beads made of ordinary glass and the oil. I chose 11/0 (2.2 mm) beads, thinking smaller beads meant more interfaces for scattering:
Laser illuminating a vial of glass beads and oil
Finally! While it’s not perfect, I like this look, and the source of the light scattering will not sink into oblivion any time soon. Coming up with an explanation is a little harder. Do the beads represent the sands of the Judean desert? Shattered windows of the Second Temple? Did they even have glass windows at that time? Well, regardless of explanation, this is what I will use for the final version.